Food

Carrot Curry Soup with Biscuit and Pesto

A Soup to Soothe the Cold

Carrot Curry Soup with Biscuit and Pesto

My darling Boston has been experiencing a warmer than expected winter, so far. The lack of cold has meant that I have developed a robust appetite for soups as I usually do. This week, we had a bit of a cold snap when the temperature dropped into the teens from the mid-30s. It was a wonderful opportunity to make this carrot curry soup.

The truth is that I don’t know if I really like carrots. I am a bit of a picky eater. There are certain foods I only tolerate in specific preparations. Carrots are one of those. I can only seem to eat my carrots in soup form. Any other preparation and I am not likely going to be a fan. Although, there are a few salad options I have tried and liked.

Carrot Curry Soup with Biscuit and Pesto

I, overwhelmingly, prefer to taste the full range of flavors on my vegetables. One of the things that draws me to this Carrot Curry Soup is how insanely robust and flavorful it is. There is no hiding from the carrot in this soup. The roasting of the carrot to get that caramelization completely changes the way it presents itself in the soup. The carrot suddenly has both a sweet and salty taste on the tongue. This is one of my favorite things about this soup

As the name Carrot Curry Soup suggests, the curry paste is an important part of this production. Finding a good red curry paste makes a difference in this soup. I usually buy a popular brand that I have used and liked for years. Toasting the curry paste a bit before cooking is something I learned from reading South East Asian recipes. It gives the curry a chance to develop a heavenly fragrance while waking up dormant oils.

There is a bit of a choose your adventure to making soup. You can make it as thick or as thin as you desire. I personally prefer this carrot curry soup so thick it feels like a mousse. The feel of air on the tongue is one that makes quite a difference when eating this.

I have served this carrot curry soup with an insanely flavorful Walnut Cilantro pesto sauce that is still in testing. Hopefully, I can get that recipe out to you soon.

Please try the recipe and let me know what you think.

Carrot Curry soup in a white bowl

Carrot Curry Soup

Sinmi
Delightful use of carrot and red curry paste to create a warming winter soup.
Prep Time 15 minutes
Cook Time 40 minutes
Total Time 55 minutes
Course Main Course, Soup
Servings 4

Ingredients
  

  • 1 pound Carrot peeled and quartered
  • 4 Tbsp Coconut Oil
  • 3 Tbsp Red Curry Paste
  • 13.5 oz Full Fat Coconut Milk this basically one can of coconut milk
  • 3 cloves garlic chopped
  • 2 inches ginger chopped
  • Salt to taste

Instructions
 

  • The first step is roasting the carrots. Put the carrots on a baking sheet, add in two tablespoons of coconut oil and some salt. Mix it so that everything is well coated. Place in an oven that has been preheated to 400F. Roast for 25 minutes or until carrots is well browned.
  • In a medium-sized pot, heat up the leftover coconut oil. Add in the chopped garlic and ginger. Sauteed at medium heat for about 3-4 minutes. Stir in the red pepper paste. Keep stirring and heating until the paste mixture is fragrant.
  • Pour the coconut milk as well as 2-3 cups of water. Stir until the paste is well dissolved into the liquid. Add in the roasted carrots. Let it boil at medium heat for about 10-15 minutes.
  • Let soup cool down a bit before attempting to blend, for safety reasons. Once it is cool enough to handle, blend soup until smooth. This can easily be done in a food processor or blender. 

Notes

*I like to blend the soup for a long time to whisk some air into it. This gives it a mousse like texture when you are eating it. 
*Also, I serve mine with a tangy walnut cilantro paste sometimes. This adds a serious depth of flavor to the bowl. The recipe for that is here.
Keyword carrot, coconut, coconut milk, coconut oil, garlic, ginger, lemongrass, red curry paste, roasted carrot
Lemony Yogurt Tahini Sauce made with a black whisk in a white bowl

Lemony Yogurt Tahini Sauce

Lemony Yogurt Tahini Sauce made with a black whisk in a white bowl

This sauce was a surprise that came out of nowhere. I needed a sauce to plate my smashed twice cooked cumin potatoes. I was fiddling with items in the kitchen for the sauce. Suddenly I remembered I had tahini in my cupboard. This is the origin story of this lemony yogurt tahini sauce.

I am writing this particular lemony yogurt tahini sauce recipe as much for you as for me. Just like I am writing this blog as much for me as it is for you. I am not even sure if it is for you. To be honest, as at the time I am writing this, this food blog is really nothing other than a project to soothe my anxiety. By embracing the idea of writing and creating food once again, I am finding control in some place. Every other part of my life is out of my control at the moment. But, this blog is within control.

A whisk coated with Lemon Yogurt Tahini Sauce

Yes, I don’t control if anyone would see this. But I control my creativity. Everyday when I go into my kitchen and I cook another item for the blog, it is another modicum of control over a situation that has escaped from my grasp. Perhaps making lemony yogurt tahini sauce is the way I will get unstuck from my life. Or maybe it will just be another thing that I do and quit when it gets too hard. Who knows? All I know is that at this moment the process of creating this space is making me happy and that is the only valid metric.

Okay! I have said too much. This is a food blog after all. This lemony yogurt sauce is just the right amount of tangy and nutty. It is what I imagine I would make if I like eating crudites (I don’t) But I’ll definitely use this on chickpeas and maybe that chicken shawarma bowl.

Give it a try! Let me know if you like it.

Crispy potatoes with lemony yogurt tahini sauce on a white plate
A whisk coated with Lemon Yogurt Tahini Sauce

Lemony Yogurt Tahini Sauce

Sinmi
An easy sauce that makes a wonderful dip not just for crispy potatoes but also crudites and falafel balls.
Prep Time 10 minutes
Course Side Dish

Ingredients
  

  • 1 Lemon juiced
  • 1/2 cup Greek Yogurt I prefer whole milk yogurt
  • 1 tbsp tahini
  • Salt to taste
  • 1 clove Garlic grated

Instructions
 

  • Add all the ingredients in a bowl and whisk until smooth. Or you could also dump it in a blender and let it do the hard bit.
Keyword greek yogurt, lemon, tahini, white sauce, yogurt, yogurt sauce
smashed twice cooked cumin potatoes in a white plate with a white sauce and parsley

Smash it!

smashed twice cooked cumin potatoes in a white plate with a white sauce and parsley

I first made this potato recipe on Thanksgiving day. It was one of those things that I just kept playing with, in my head. Unsurprisingly it worked. This recipe for Smashed Twice Cooked Cumin Potatoes is one that would work so well in any meal prep plan.

For me, when I meal prep, I want to be able to combine my foods with different items. To prep the potatoes I used in this recipe, I boil the potatoes and smash them once they are soft. Once the potatoes cool down, I store it in the fridge. This initial cooking of the potatoes gives me a lot of flexibility when I am ready to use the potatoes. So instead of having finished dishes, I like to have cooked or prepped items that can be combined to make different dishes. This way I don’t get stuck in a rut of feeling like I am eating the same thing every day.

smashed twice cooked cumin potatoes in a white plate in a black cast iron pan

Spices can really make a huge difference in changing up the way food taste. The cumin in this smashed twice cooked potatoes does a marvelous job making this feel so different. Cumin and I have had a loving relationship. This relationship with cumin only got better once I became obsessed with chicken fat. This means, more often than not, when I use cumin in a recipe, chicken fat makes an appearance. I just found that the combination works. Individually, cumin and chicken fat work. Together, they are magic like in this Smashed Twice Cooked Cumin Potatoes.

If you can’t get chicken fat, duck fat is also a very good option for cooking this potatoes. If you don’t want fat from a bird, a butter or ghee works nicely as well. The point is that you want to use a fat that has good flavor when you are making potatoes. Don’t skimp on flavor by using neutral oil.

I served the smashed twice cooked cumin potatoes with a lemony yogurt tahini sauce. The recipe for the sauce is here.

smashed potatoes in a black cast iron pan.

Smashed Twice Cooked Cumin Potatoes

Sinmi
A meal-prep favorite of mine, these smashed twice cooked potatoes are crispy and loaded on flavor when done. Don’t believe me, try it!
Prep Time 5 minutes
Cook Time 40 minutes
Total Time 45 minutes
Course Side Dish
Servings 4

Ingredients
  

  • 1.5 pounds Potatoes russett potatoes work well
  • 1 tsp Cumin seed
  • 3 tbsp Chicken fat duck fat or ghee make a great substitute
  • Salt to taste

Instructions
 

  • Don’t peel the potatoes. Simply scrub the skin. If the potatoes are large, cut into large chunks.
  • Cook the potatoes in well-salted water until fork tender. Drain
  • Allow the potatoes to cool a bit. Once you can handle then, flatten with the side of a cup, rolling pin or your palms. If you are meal prepping, this is the best point to store the potatoes.
  • When you are ready to eat the potatoes, heat a pan big enough to hold all the potatoes. Add in 2 tbsp of chicken fat. Once that is melted, add in the cumin seeds.
  • Once the chicken fat is sizzling, add in the potatoes. Press the potatoes into the pan so that they spread out and flatten out. Then leave it alone. You want the bottom to fry and crispy up undisturbed.
  • Keep listening to the pan, as it starts to crackle regularly, you know it is time to turn. Usually takes about 7-10 minutes. It is time to flip the potatoes.
  • Try as much as possible to turn all of the potatoes. It is not going to be a neat singularly piece. It is likely going to crumble. That’s ok. 
  • Once you are happy with the new flat layout, tuck bits of the single tablespoon of fat leftover into the potatoes. You can place the bits of fat on the edge of the pan for extra crispiness.
  • Fry on the second side for about 5 minutes. Then you are ready to serve the smashed twice cooked cumin potatoes.
Keyword chicken fat, cumin, potato, potatoes, smashed potatoes
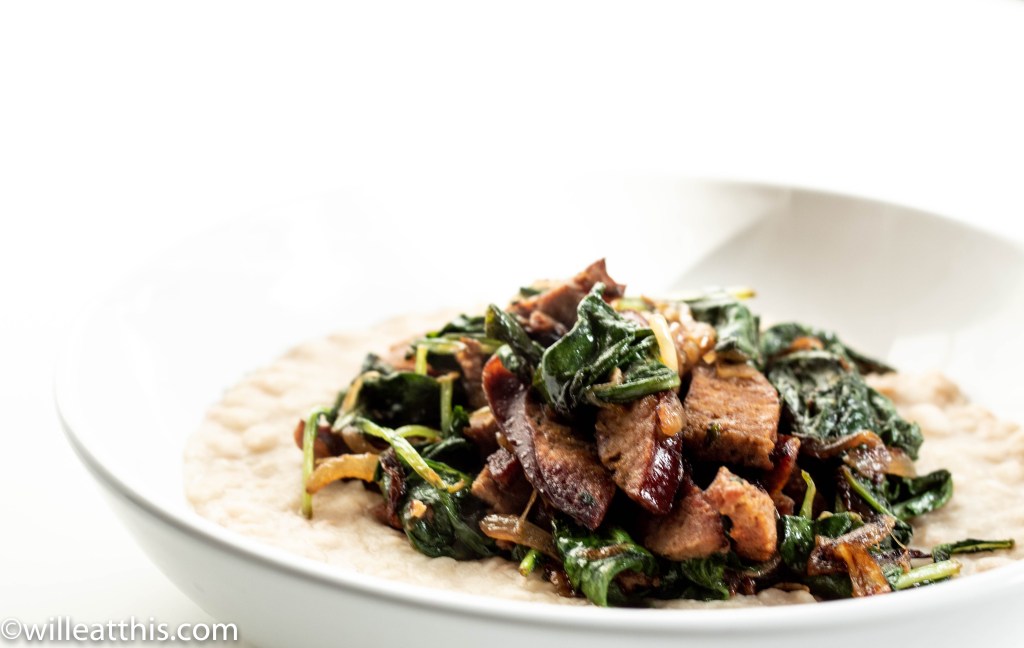
Turkey Kielbasa stir fry in a white bowl

Monday Blues

Turkey Kielbasa stir fry in a white bowl

It is always surprising to me that I still have a sense of Monday as the beginning of the week. I have spent most of my career working an unconventional schedule. This means I work during the weekend. My days off are usually during the week. So, Monday for me is really just another day of the week. However, I still find myself in the Monday Blues needing something easy to get me going. This Turkey Kielbasa stir-fry has become the thing.

Turkey Kielbasa stir fry in a white bowl

I love sausages. Always have, always will. But my relationship with any sausage is complicated because I don’t eat pork or its derivative. Almost all sausage products are encased in a pork casing, even when the filling is not pork based. This makes it hard for me to get sausages because I find myself reading ingredients fine print. Luckily I have been able to find a few brands that use collagen casing.

The thing I like about the Turkey Kielbasa from Hillshire Farms is the seasoning. The sausage has a balanced blend of herbs and spices. I don’t have to worry about seasoning the foods I put it in. This makes it a perfect backbone for a quick meal on a lazy night.

The other thing I should tell you about this turkey kielbasa stir fry is that it is not finicky. There is no order of business other than getting the sausage into a hot pan along with the vegetables. Everything just needs to heated thoroughly because the turkey kielbasa is already cooked.

I have served this with my favorite mashed white beans again. I feel like it is time for me to write a recipe for this mashed white beans because it is so easy and goes so well with everything. Anyway, I hope this turkey kielbasa stir fry brings some joy to blow the Monday blues away.

Turkey Kielbasa stir fry in a white bowl

Turkey Kielbasa Stir-fry

Sinmi
A super speedy recipe for an easy Monday meal featuring turkey kielbasa and vegetables.
Prep Time 15 minutes
Cook Time 15 minutes
Total Time 30 minutes
Course Main Course
Servings 4 servings

Ingredients
  

  • 16 oz Turkey Kielbasa sliced
  • 1 Yellow Onion sliced
  • 2 Cloves Garlic Smashed and chopped
  • 1 tsp sweet paprika powder
  • 1/2 tsp chili flakes
  • Salt to taste
  • 2 tbsp Olive Oil Use a light or neutral olive oil
  • 1 pound Baby Kale

Instructions
 

  • Add the olive oil into a pan to heat.
  • Once the olive oil is hot, add in the turkey kielbasa slices, onion slices, chopped garlic. Gently shake pan to get the items moving.
  • Season pan with salt, chili flakes, and paprika. 
  • Once the onion starts showing signs of caramelizing, add in the kale and continue to cook for a couple of minutes
  • Take the pan off the heat and serve stir-fry. 
Keyword turkey kielbasa, turkey kielbasa stir fry, turkey sausage, turkey stir fry
Holding a bitten walnut ginger shortbread between two fingers

A Smooth Homage to Walker’s

Holding a bitten walnut ginger shortbread between two fingers

There are few things that give me a pause like baking. I am not a natural baker. I haven’t baked long enough to feel like I can trust my intuition. Yet, nothing draws me like baking. I feel like my lack of skills is a challenge. The only way to get better is to try and try. Study my failures and enjoy my successes. Baking this walnut ginger shortbread was definitely a success.

A lot of what I do in terms of food is re-imagining things that I have seen. I try to change the details so that the core is the same but the experience of food shifts. This particular shortbread recipe is based upon the master shortbread recipe on the New York Times Cooking site. I find that recipe to be a good place to start when making shortbread because I have used it many times.

However, when I started thinking of this walnut ginger shortbread, I knew I had to look beyond just dumping in the ingredients. I wanted them to blend into the shortbread recipe and let it become it own thing. Hence, I made some adjustment to the recipe, not just the ingredients but the technique as well. The changes I have made reflect the way I enjoy food; both the cooking and eating.

short stacks of walnut ginger shortbread on a white plate

Despite the nut in the walnut ginger shortbread, I want to still have a smooth experience in the mouth. This meant finding a way to turn the walnut into a sort of flour instead of lumps studded into the dough. The crystallized ginger is a homage to Walker’s version of the Ginger Shortbread. The ginger is also chopped finely so that the dough remains smooth.

One finally note I will make about the process of figuring out this cookie is the baking temperature. I played around with the baking temperature until I arrived at a temperature and timing that gave just the right amount of browning. I hope you try out the recipe for the walnut ginger shortbread. It is really easy but produces a cookie that is marvelous with tea.

Holding a bitten walnut ginger shortbread between two fingers

Walnut and Ginger Shortbread

Sinmi
A melt-in-the-mouth shortbread cookie with crystalline ginger
Prep Time 20 minutes
Cook Time 20 minutes
Chilling Time 4 hours
Total Time 40 minutes
Course Dessert
Servings 6 servings

Ingredients
  

  • 1 Stick Butter room temperature
  • 1/2 Cup Walnut Flour
  • 1/2 Cup Crystallized Ginger chopped into tiny bits
  • 11/4 Cup All purpose flour
  • 1/4 Cup Corn Flour
  • 1 egg yolk room temperature
  • 1/2 tsp salt
  • 1 cup Powdered Sugar

Instructions
 

  • In a bowl, combine the sugar, ginger, walnut flour, all-purpose flour and corn flour with salt.
  • Cream the butter and the egg yolk together until fluffy. 
  • Add in the flour mixture, about 2 tbsp at a time, and mix gently. Don’t mix too much so that the cookie remains flakey.
  • When flour and butter mixture is incorporated, pour the dough on parchment paper and gently roll into a log. 
  • It is time to chill the cookie dough. I prefer to have the dough in the refrigerator for at least 12 hours but four hours is the recommended minimum. The dough would last in the freezer for a couple of months. If you freeze, bring out cookie dough into a refrigerator at least a couple of hours before baking.
  • When it is time to bake, preheat oven to 300F.
  • To bake the walnut ginger shortbread, cut the log into 1/4 inch thick coins. Place on a baking tray, preferably lined with parchment paper or a silicone mat. 
  • Bake in the oven for about 20 minutes. The shortbread can be baked longer if you prefer a bit more color on the cookies.
Keyword Cookies, ginger, shortbread, walnut
Roasted Butternut Squash Medley on Grains

On Loving Butternut Squash

Roasted Butternut Squash Medley on Grains

I am trying to figure out how I got a point where I can be talking about eating a roasted butternut squash medley. It just seems so strange because a couple of years ago, I did not know what a butternut squash taste like.

Working in a grocery store helped me discover new foods after I immigrated to the US. I got an opportunity to try many different types of food. Looking back now, I realize that it was rare for me try a new vegetable. Eating new fruits is very easy. I was hesistant but I ate random slices of cheese.

Vegetables just never made it to the priority list of things I should try eating. This is sad because one of my favorite stories about learning to love new food involves eating a strip of raw red pepper. I know that good things happen when I give myself a chance to try new things. Sometimes, it is just hard to get through that initial first barrier. How do I cook it?

As I have become more intentional about eating more colors of foods and diversifying my taste experience, I have been become unabashed about asking questions. Plus, there is the magic of a smartphone and google. Yes, I am that girl in the aisle, using her phone to search recipe on how to cook or eat a fascinating item. This approach is how I suddenly found myself loving the squash family.

I can’t tell a lie. Butternut squash is one of the things that I like to have on hand at home. It is a quick meal waiting to happen. I tend to buy mine, unpeeled and unprocessed. This way I don’t have to worry about eating it immediately. Yes, it is a pain to peel on some days. However, once that’s done, I can get down to the cooking and the eating.

Lately, I have been on a roasted butternut squash medley binge. I think the whole fixation started after I roasted the first batch with a touch of apple cider vinegar. The vinegar is magic with the sugar in the butternut squash. It just makes it so much more alive instead of just sweet. This vinegary goodness combined with the caramelized onions and the jammy pepper chunks, I could eat bowls of this roasted butternut squash medley all day. Maybe I do, already.

Close up picture of Roasted Butternut Squash Medley

Since I am always looking for more flavor, I look adding bits of topping to the roasted butternut squash medley when I serve it. A little of bit of reduced balsamic vinegar, or balsamico, adds another dimension. Adding nuts for some added crunch is also another trick I use to make this food experience one I keep reaching for regularly.

The recipe for this is quick prep-wise. Especially, if you buy the butternut squash already peeled and chopped at the store. The oven does most of the work for use. Let me know if you try out the recipe.

Uncooked tray Roasted Butternut Squash Medley

Roasted Butternut Squash Medley

Sinmi
Roasted vegetables are one of the easiest ways to eat more vegetable and a staple of a good food prep regime. This butternut squash medley features onions and pepper.
Prep Time 15 minutes
Cook Time 30 minutes
Total Time 45 minutes
Servings 4 servings

Ingredients
  

  • 1 Butternut Squash peeled and cubed
  • 1 Onion (small) sliced
  • 1 Yellow Pepper cubed
  • 2 Tbsp Olive Oil
  • 1 Tbsp Apple Cider Vinegar
  • 2 Cloves Garlic
  • 2 Sprigs Thyme or use 1 Tsp of dried thyme
  • Salt to taste
  • 1 tsp Chilli Flakes

Instructions
 

  • Preheat oven to 400F.
  • On a baking tray, add in the butternut squash, pepper, onion, garlic, thyme, olive oil, vinegar, and salt. Toss gently to evenly distribute. 
  • Place in the oven and let it roast for about 20 minutes. Open the oven and move vegetables around in the tray. Return to oven.
  • Let it roast for an additional 5-10 minutes until it develops some color. Pull out of the oven and serve.
Keyword butternut squash, roasted pepper, roasted vegetable
A bowl of broccoli apple soup

‘Tis the Season of Healthy…

A bowl of broccoli apple soup

We finally got through the holiday season! And I say ‘we’ because it seemed everywhere I looked, there was another indulgence. From the month-long cookies post on Instagram to the decadent pies, December was the month to devour. Now, ‘we’ are all here. Here in this place where it seems the pendulum swings encouraged gluttony to starvation. We are in the season of healthy, new beginning and elimination of major food categories. While I don’t subscribe to the drastic pendulum swings, I am solidly ready to be sipping this Broccoli Apple soup.

I don’t believe in diets. Been there done that. Still paying the price for years of denying myself food in the name of health. Instead, I believe in moderation. I believe in the joy of food as a part of daily living. Food is part of my self-care routine. Eating is a statement of self-love. Choosing to eat food, in its entirety and complexity, is more important to me than any superficial aesthetics or number on the scale.

One of the ways that I care for myself is to eat things that make me feel good from the inside out. This Broccoli Apple soup is one of my winter favorites. I know that it may seem like hypocrisy to be writing about self-care, body-positive and a decidedly low calorie soup in the same page. Let me challenge that thought by asking if eating well has to me either or. Is it possible to eat with moderation?

A black hand squeezing a wedge of lemon into a bowl of broccoli apple soup

This Broccoli Apple is one of my favorite things because I love the taste of hot green soup in the morning. This one just happens to be the soup I reach for in the winter. I think the combination of the heartiness of broccoli with the slight sweetness of the apple just makes me feel awake. Adding a squeeze of fresh lemon juice to the Broccoli Apple soup is definitely a must me.

A bowl of broccoli apple soup

Broccoli Apple Soup

Sinmi
A refreshing breakfast soup featuring two ingredients, broccoli with apple. It is a quick and easy make that stores well.
Prep Time 15 minutes
Cook Time 15 minutes
Total Time 30 minutes
Servings 5

Ingredients
  

  • 1 Pound Broccoli
  • 3 Apples I love using granny smith for it tartness. But any apple works
  • 1 Lemon
  • Sea Salt

Instructions
 

  • In a pot, add 4 cups of water and set it to boil.
  • While the water is boiling, deseed and chop up the apple. Also, cut the broccoli florets and stem into pieces that would fit into the pot.
  • Add the chunks of apple and broccoli into the pot of boiling water. Let it cook for about 5 minutes. Set it aside to cool.
  • Blend to the broccoli and apple to your decided consistency. I prefer mind just a bit short of smooth. Season with salt to taste.
  • When serving soup, add a wedge of lemon to be squeezed in just before consumption.
Keyword apple, broccoli, broccoli soup, soup
Smoky Shrimp Confit on Mashed White beans

Shrimp Confit with Mashed White Beans

Shrimp confit served on mashed white beans and drizzled with oil.

I did not realize until a few years ago that black eye peas are actually a thing for New Year’s Day. The importance of black eye peas became apparent when I worked in a grocery store. All year, the frozen black eye peas just never seemed to go anywhere. Then, the week between Christmas and New Year’s Eve, they disappeared. Suddenly, customers are asking if we have more black eye peas in the back. I was flabbergasted but I found myself picking up this distinctly American tradition, in my own way. This New Year’s I am tapping into this tradition by eating beans on the first day of 2019 with this delightful smoky shrimp confit.

As an immigrant, my life is a blend of what I grew up knowing as my culture and what I have found in my odyssey away from my birthplace. There are parts of my new heritage that are intentional because I try to be very specific in who I am becoming. There are other parts that I have found and adopted through curiosity. My palate is very much about curiosity. There are many foods I did not understand at the beginning of my journey. Now, I find myself eating foods that amaze the woman that I am now.

Smoky Shrimp Confit in Oil

Since I am not a big fan of black eyes peas, I am serving the confit shrimp with white beans. The idea to mash my beans comes from my love of ewa agoyin. Ewa agoyin is one of those Yoruba meals that nobody makes at home. Ewa agoyin is best eaten from the pots of a food hawker that parading the streets. There is something mythical about the deeply fried sauce is ladled in the well created within the plated mashed beans. I could tell you what the flavors in the sauce harken to but I can guarantee that nothing made at home is like the hawker’s sauce. A good ewa agoyin hawker’s sauce is not only dark, but it is also smokey, salty and gritty in texture.

I have tried to capture some the mythical nature of this dish by serving the black eye peas with an intensely flavored shrimp confit. The oil for this confit is where all the flavor exists. It is deeply flavored from the use of garlic and herbs. The smokey nature is pronounced from the addition of a sweet paprika powder that lends it a vibrant color as well.

Smoky Shrimp Confit on Mashed White beans

Don’t be afraid of the oil in this dish. The seasoning to cook the shrimp means the oil is deeply flavorful. If you don’t soak up all the oil with bread while eating, store it in the fridge for a couple of weeks. It can be used on savory oats, to sauteed vegetables for a quick meal or even used to poach salmon.

The shrimp confit is a dish that requires patience but the result are so worthy of the time it takes to create. Why not start the new year off by coming to investing time in yourself? Cooking and exploring the different flavors that can exist in one meal is a good starting point.


Smoky Shrimp Confit in Oil

Smoky Shrimp Confit

Sinmi
Shrimp is slow cooked in a bath of oil seasoned with herbs, garlic, and paprika.
Prep Time 20 minutes
Cook Time 30 minutes
Cooling Time 15 minutes
Total Time 50 minutes
Course Main Course
Servings 4 servings

Ingredients
  

  • 1 pound shrimp (deveined)
  • 1 tbsp Sweet paprika
  • 1/2 small onion cut into wedges
  • 1 sprig rosemary
  • 3 sprig thyme
  • 4 cloves garlic
  • 1 tbsp salt
  • 11/2 cups oil don’t use olive oil. Canola oil or a bland oil like safflower works best.
  • 1 tsp chilli flakes

Instructions
 

  • In a medium sized pot, add in the oil. Add in the rosemary, thyme, onion, and garlic. Cook over medium heat until the oil is fragrant. This process takes no more than ten minutes. Let the oil cool down and strain. This step can be completed a day or two ahead.
  • Pour strained oil back into the pot. Add in the paprika, chili flakes, and salt. Heat up until oil is just warm, around 200F. It should be at low heat.
  • Add in the shrimp in bulk, carefully. Doing this brings down the temperature of the oil so that it does not fry the shrimp. Keep oil on low heat. Monitor the heat to be sure it is not too hot. Cook until shrimp for about 20 minutes when it starts getting a pink hue.
Keyword confit, paprika, seafood, shrimp, shrimp confit
Sliced Citron Honey Tea Poached Pear with Toasted Pound Cake and orange served with yogurt on a white plate

To Poach A Pear

Sliced Citron Honey Tea Poached Pear with Toasted Pound Cake and orange served with yogurt on a white plate

Poaching is one of those things that seems to put fear in the heart of many. Maybe because it sounds so fancy. Who hasn’t had anxiety about poaching an egg? Or maybe a pear? Citron Honey Tea Poached pear is one of those things that I find to be delightful in the winter.

Poaching is one of my favorite cooking techniques. It requires patience because it is not the quickest option. However, poaching is an act of gentle love because it allows flavor to be impacted while maintaining the softness of the food. When a pear is well poached, it does not fall apart. Instead, it maintains its integrity while absorbing the flavor it has been bathed in. This citron honey tea poached pea definitely captures flavor well.

When I was thinking of poaching pears this winter, I really wanted to tap into unconventional flavors like citron. Citron, also known as Buddha’s hand, is one the most mysterious fruits. It is a citrus with a juice flesh. The Buddha’s hand despite is lack of juice is one of the most perfumed fruits or flowers I have encountered. The smell on this fruit is divine. The citron is best used to infuse food.

One of the first way I ever tasted citron was via the citron honey tea that I buy from the Asian food market in a massive jar. I love the citron honey tea because I can drink it on its own merit. Or, I can also use it make other types of tea. Since citron has not juice, it lacks the sour edge of a citrus. This means when I use it in tea recipes, it mostly adds an olfactory experience to the tea drinking.

Poaching the pear in a bath of citron honey tea was like capturing winter on a plate. I loved it. Especially since I served it with a toasted slice of a pound cake I made using King Arthur Flour recipe. I added in some orange oil and zest into that recipe to add another dimension. I often toast my pound cake on the stove to give it a crunch. The plate is rounded out with a dollop of unsweetened whole milk greek yogurt. I almost feel like I could have this citron honey tea poached pear plate for breakfast.

Care to join me?

Toasted Pound cake with a wedge of orange
Citron Honey Tea Poached Pear with toasted pound cake, yogurt and a wedge of orange

Citron Honey Tea Poached Pear

D’Andjou Pears are poached in a bath of citron honey tea to capture some of the citrus scent of winter in this easy recipe.
Prep Time 20 minutes
Cook Time 25 minutes
Total Time 45 minutes
Course Dessert
Servings 8 servings

Ingredients
  

  • 4 Pears I used D’Anjou Pears
  • 1 Cup Citron Honey Tea If you can’t find citron honey tea, you substitute with a citrus marmalade.
  • 1/2 Cup Sugar optional
  • 1 Inch Cinnamon Stick
  • 1 Orange Sliced

Instructions
 

  • Fit your unpeeled pear into a smaller sized pot to test which would hold the pears snuggly and allow the fluid to cover the pears mostly.
  • Peel and core the pears. If you prefer, you can also cut the pears into half lengthwise.
  • Once you have found a good sized pot, add the citron honey tea, cinnamon, orange slices, and water. If you are using the sugar, add it in now. Bring the mixture to a simmer and stir until honey and sugar dissolve.
  • My trick for getting the poaching bath to the right temperature is turn off the heat. Once it cools a bit, I put on the heat back on to a “barely there” level, then add in the pears. You don’t want to see any signs of boiling or simmering. It should be a very gentle heating process.
  • After 15 minutes, start checking at regular intervals is the pears are soft yet. The pears are ready if a clean toothpick inserted goes in without pressure.  
  • Retrieve the pears from the poaching bath. 
  • This step is optional: Strain out the poaching fluid and put it back on the heat. Reduce the poaching tea until it coats the back of a spoon. This citron honey syrup can be used to serve the poached pears or even to sweeten beverages and oats.
Keyword Buddha’s Hand, Citron Honey Tea, Citrus, Pear, Poached Pear
A loaf of knead bread with a slice beside it on a mesh rack

No-Knead Bread

A loaf of knead bread with a slice beside it on a mesh rack

There are few things in life that I find more comforting than bread. Especially the Agege bread that the hawkers used to carry around on top of their head in Lagos. That soft doughy white bread that was just the perfect vessel for all kinds of food. If you have never had Agege bread stuffed with the the fatty trims of suya, you haven’t eaten one of the best things. Or maybe you have never tried Agege bread with akara or the perfectly soft moinmoin. Missing Agege Bread led me to no-knead bread.

There are few things I miss about home like I miss bread. The way bread just seemed to be on every corner and you could always figure out a meal pronto. It might seem crazy that I miss bread in a country where the grocery stores have a million and one options for bread. There is every shape, every size and every ingredient bread in every store.

slice of noknead bread with mashed white beans and poached eggs

But in a land of plenty, when that one special one is missing, you begin to question if you even belong. Lately, I have been experimenting with making bread. I am not a good bread-maker. It is important that I admit my flaws up front. It is either I am too impatient or not attentive enough when making bread. There are bread makers whose artistry and language floor me. I am just trying to make something that could fill some of that void from not having my home bread with me.

For the past couple of years, the no-knead bread has been my companion. Originally presented to the world by Mark Bittman during his time at the New York Times, this recipe has travelled around the world of food blogs. It is a pantry staple that is versatile enough. The recipe is as unfinicky as a bread recipe can be. And the result makes me feel like I have created something special when really all I have done is let flour, water and yeast rest for a long period of time. If there is one recipe I can recommend as a good place to play, it is the no-knead recipe.

I look forward to sharing my different variations of this recipe on this blog.